Products
Odoo eCommerce allows you to add products and manage your product pages directly from the Website app. It also allows you to add digital files, translate the product page content, and manage the stock.
Add products
Create products
To create a product from the frontend, click + New in the top-right corner, then Product. Enter the Product Name, Sales Price, the default Customer Taxes for local transactions, and Save. You can then update the product’s details, add an image, and customize the product page. When you Save, the product page is automatically published.
Tip
You can also create a product from the backend by going to and clicking New.
Products created from the frontend are automatically published, while products created from the backend are not. To publish a product, click the Go to Website smart button to access the product page, then toggle the switch from Unpublished to Published.
Import products
To import product data using XLSX or CSV files, go to , click the (gear) icon, then Import records.
Tip
To publish large batches of products, follow these steps:
Go to .
Remove the Published filter and switch to the List view.
Click the (dropdown toggle) icon and enable Is published.
Click the Is Published column to re-order it by published or unpublished products.
Select the products to publish by ticking their box.
In the Is Published column, tick the box for any of the selected products, then Confirm to publish them.
Product information
To add general information about a product, navigate to and select the product. You can configure the product page from the form by adding variants, digital documents, or translating content.
You can also add an e-commerce-specific product description to be displayed below the product name on the product’s page. To do so, go to the Sales tab, scroll down to the Ecommerce description section, and add a description. Use Odoo’s rich-text editor features to personalize the content.
Tip
Click the Go to Website smart button to return to the frontend product’s page.
Product images and videos
To add more media items, such as images and videos, navigate to the product form, then go to the Sales tab and click Add Media under the Ecommerce Media section. In the Select a media pop-up window, go to the Images tab, select an image, click Upload an image or Add URL. Or navigate to the Videos tab, paste a video URL or embed code. Once done, click Add.
Tip
Click the Go to Website smart button to access the product’s page on the website and customize product images and videos using the website editor.
Digital files
You can link digital files like certificates, eBooks, or user manuals to the products. These documents are available before payment on the product page or in the customer portal after checkout.
To link a digital file to a product, go to the product form and click the Documents smart button. Then, click Upload to upload a file directly, or for additional options, click New, then Upload your file.
Tip
You can link a URL instead of a digital file. To do so, click New, go to the Type field, and select URL.
To edit an existing file, click the (dropdown menu) in the top-right corner of the document card and click Edit.
Digital files available before payment
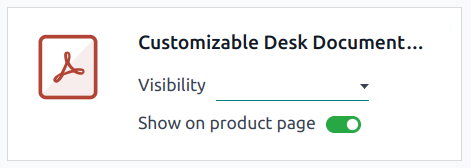
To make the file available on the product page (before payment), leave the Visibility field blank and toggle the Show on product page switch.
Digital files available after payment
To make the file available (after payment), set the Visibility field to Confirmed order and turn off the Show on product page switch.
Translation
If multiple languages are available on your website, you can translate a product’s information directly on the product form. Fields that support multiple languages are identifiable by their abbreviation language (e.g., EN) next to their field.
The e-commerce-related fields to translate are:
Product name.
Out-of-Stock Message (under the Sales tab).
Sales Description (under the Sales tab).
Website availability
To set the product’s website availability, navigate to the product form, go to the Sales tab, and in the eCommerce shop section, select the Website you wish the product to be available on. Leave the field blank to make the product available on all websites.
Note
You can make a product available on either one website or all websites, but selecting only some websites is not possible. To sell the product on multiple specific websites without making it available on all, duplicate the product for each website and assign the corresponding website to each duplicate.
Enable the Is Published toggle to make sure the product is available for website visitors.
Stock management
To enable and configure inventory management options, go to , scroll down to the Shop - Products section and the Inventory Defaults sub-section.
Important
The Inventory app must be installed to see the inventory management options.
To display the stock level on the product page, the Product Type field must be set to Storable in the product form.
Tip
If a unique reference is needed for inventory management, install the Manufacturing app, and create Kit bills of materials. Each kit links its published “virtual” products to the main reference tracked in Inventory. This ensures that any item sold on the website is converted into the corresponding stocked item in the delivery order.
Inventory
In the Inventory Defaults sub-section, fill in those fields:
Out-of-Stock: Enable Continue Selling to allow customers to place orders even when the product is out of stock. Leave the box unchecked to prevent orders.
Show Available Qty: Displays the available quantity left under a specified threshold on the product page. The available quantity is calculated based on the On hand quantity minus the quantity already reserved for outgoing transfers.
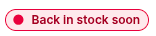
To inform customers that a product is out of stock, configure an Out-of-Stock Message. To do so, go to the product form and navigate to the Sales tab. Under the Ecommerce shop section, compose an Out-of-Stock Message.
Note
A (envelope) Get notified when back in stock button appears on the product page when an item is out of stock. Customers can click the link to enter their email address and receive a notification once the item is back in stock.
To create an Out-of-Stock Message and have the notification option available, the Track inventory setting must be enabled on the product form.
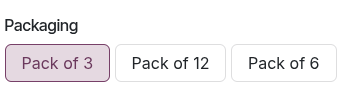
Packagings
To offer different product pack sizes to customers on the e-commerce, configure product packagings. Then, go to , select a product, and navigate to the Sales tab of the product form. Under Upsell & cross-sell, add as many package types as needed in the Packagings field. The available package types are displayed on the e-commerce product page.
Tip
It is also possible to add packagings to a specific product variant. To do so, go to the product form, click the Variants smart button, and select the relevant product variant. Under Sales, add as many package types as needed in the Packagings field.